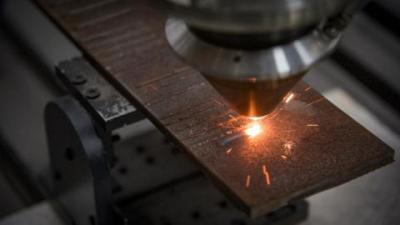
Researchers from IIT Bombay are working on methods to ease the machining of titanium through annealing
Titanium alloys, made from the lustrous metal titanium, are used in a wide range of products—from aircraft engines to mechanical implants inside the human body. Their widespread use is due to their unique property of being durable, hard, lightweight, resistant to corrosion and biocompatible—they are non-toxic to our body. However, these properties have a flip side; they make titanium alloys a stubborn material to cut into the desired shape. Could changing the physical properties of these alloys make it easier to cut them?
That’s the question keeping a group of researchers, led by Prof. Sushil Mishra of the Department of Mechanical Engineering, at the National Centre for Aerospace Innovation and Research, Indian Institute of Technology Bombay, busy. In the past three years, the researchers have devised and implemented various methods, like annealing that involves heating and gradual cooling, and laser heating, to change the structure of the alloys at a molecular level. These easy to implement methods are aimed at making the alloys easier to machine—the process of cutting them into the desired shape by removing excess material.
Turning is a popular machining method used for making components. A tool is used to scrape off material from the surface of a rotating cylindrical bar until the desired shape is obtained. In the case of titanium, turning is not easy since the hardness of the metal results in an uneven movement of the cutting tool. This shortcoming poses a significant disadvantage for the fabrication of parts used in biomedical applications, where a smooth surface finish is important. During turning, the material gets deformed just below the surface (subsurface deformation) when the tool scrapes off material from the surface, weakening the structural properties of the final component and making it susceptible to corrosion. Also, the heat generated due to friction while cutting is not quickly dissipated as titanium is a bad conductor of heat, leaving the surface rough and uneven.
The excessive heat also damages the cutting tool and blunts its edges, increasing its maintenance cost. While there are changes made to the tool material, its geometry and machining parameters, and coolant used to facilitate heat dissipation, to overcome these drawbacks, these methods add to the cost, sometimes making it as expensive as procuring the titanium alloy!
Research in the past has shown that the machinability of titanium alloys is determined by various factors, including their hardness, size and texture of crystals, and their composition. Hence, changing the microstructure of the titanium alloy could help in enhancing its machinability. The researchers at the National Centre for Aerospace Innovation and Research, IIT Bombay, are pondering on the possibility of changing these factors, using annealing and laser heating.
New approaches to improve machinability
One way to change the crystal structure of titanium alloy is to heat it to the ‘recrystallisation temperature’—a temperature that is sufficiently high but lower than the melting temperature--- and then gradually cool or anneal it. The researchers at IIT Bombay tested annealing at two temperatures—at about 700°C and 900°C. They found that when the alloy was heated to about 700°C, it recrystallised partially, and when heated to about 900°C, it recrystallised fully, forming a larger grain structure. The hardness of the annealed samples decreased with an increase in the annealing temperature.
“The samples directly received from the vendors are approximately 18% harder than the samples annealed at 925°C”, say the researchers involved in this effort. They also observed that recrystallisation reduces the reactive force that the tool experiences while cutting, and the subsurface deformation resulting from it. While annealing achieved easy machinability, it still was not the best option to retain some of the desirable properties of the titanium alloys, like their strength. The researchers then looked at laser heating to address this.
It is often enough to have a low hardness of materials only at its surface where it gets cut during machining. Hence, the researchers attempted to change the microstructure of the alloy only on the surface by selective heating using a laser beam. They moved a focussed laser beam from one end of the alloy sample to the other end to heat the surface to temperatures as high as 1200 °C, well beyond its recrystallisation temperature. They controlled the intensity of the laser beam to prevent the sample from melting and cooled it down gradually. After this process, they observed that needle-shaped crystals were formed near the surface and subsurface. The regions further away from the surface had crystals wider in shape, similar to the original material.
The researchers experimented by moving the laser across the samples at different speeds of 10, 15, 20 and 25 millimetre/minute and observed a significant change for scanning speeds up to 20 millimetres/minute, but no substantial difference beyond this speed. “At higher scanning speeds, the time for heat penetration in the sample was less due to the low thermal conductivity of the alloy. Therefore, the depth of the laser affected region is minimal in this condition, and there is very little change in the microstructure,” explain the researchers.
Overall, the hardness at laser affected zone is higher than that of original material. The increase in hardness and changes in microstructure is helpful in decreasing the fluctuation on cutting tool associated with titanium machining. This leads to improvement in tool life. Further, after removal of material inside laser affected zone through machining, some layer of modified microstructure with higher hardness (higher than the original material) still remains. This fortifies it against subsequent damage and fracture
The laser-treated samples were easy to cut, and the variation in the opposing force during cutting was lower, resulting in a better surface finish. For these samples, the researchers also studied the way in which the material was chipped off while cutting. The chips were longer than those cut from the original material, which indicates that the tool could cut the sample evenly without significant vibrations. These factors would prevent tool damage and lead to longer tool life. The researchers also developed a numerical model to simulate the process of laser annealing and found that the results matched with the experimental observations.
A significant challenge in using lasers was that the depth of heat penetration increased along the length of each sample as the heat accumulated in the alloy. “Initially, the depth of penetration increased significantly and then became almost constant at the end of scanning, about 25-30 millimetre from the starting point of laser heating,” say the researchers. This uneven heating may lead to material wastage since only the parts of the material with uniform heat penetration can be used for the final component. “Using the numerical model, this problem can be resolved by varying the laser power along the length to maintain uniform heat penetration depth for a particular sample”, suggest the researchers.
“Both annealing and laser treatment are routine operations used in the industries. The approaches suggested in this research do not need special accommodations and can be implemented immediately,” says Prof. Mishra, talking about the results of their hard work. “We need to study the tool life with laser treated samples in comparison with the untreated samples. The treatment methodology can also be extended to other machining operations such as milling”, he concludes, talking about the future scope of research.
Prof. Sushil Mishra
